
Everything about short films. Tutorials, Classes, Guides and Short film Production and promotion. For promoting go to youtube and seach for shoot it short
Saturday, 31 October 2015
Saturday, 17 October 2015
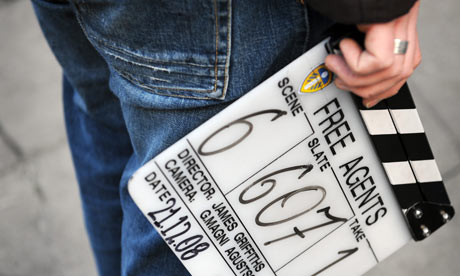
Editing and Cinematography complete guide tutorial
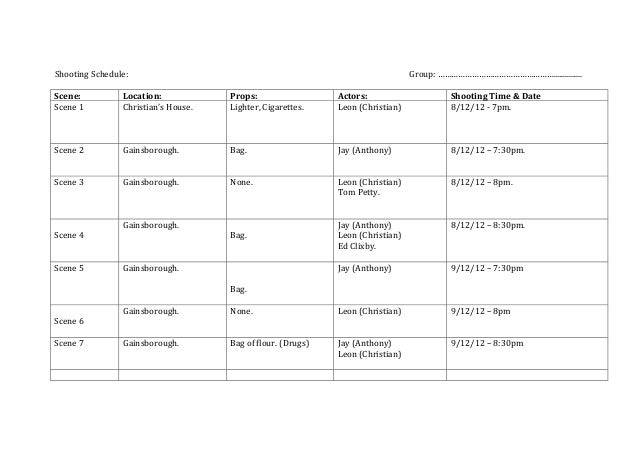
Creating a shooting plan
It is not always necessary to have a shooting plan, but it can be very helpful for large video projects. The plan can be as simple or as complex as you like. A simple list of planned scenes might be enough, or you might also want to include some notes regarding detailed camera directions or prepared dialog. The really ambitious can go all the way to a full-fledged script in which every single camera angle is described in detail along with notes about duration, lighting and props. Eg: Title: Jack on the kart trackeg:
Editing Using varying perspectives
An important event should always be shot from varying perspectives and camera positions. Later, during editing, you can use the best camera angles alone or in combination. Make a conscious effort to tape events from more than one camera angle (first the clown in the circus ring, but then also the laughing spectator from the clown’s point of view). Interesting events can also take place behind the protagonists or the protagonists may be seen in a reverse angle. This can be helpful later when trying to establish a sense of balance in the movie. Close-ups Don’t be stingy with close-ups of important things or persons. Close- ups usually look better and more interesting than long shots do on a television screen, and they work well in post- production effects. Long shots / Semi-long shots Long shots provide the viewer with an overview and establish the scene of the action. However, these shots can also be used to tighten longer scenes. When you cut from a close-up to a long shot, the viewer no longer sees the details, and it is thus easier to make a chronological jump. Showing a spectator in a semi-long shot can also provide visual relief from the main action, and the opportunity of a transition away from the action if desired. Complete actions Always shoot complete actions with a beginning and an end. This makes editing easier.Transitions
Cinematic timing requires some practice. It is not always possible to film long events in their entirety, and in movies they often have to be represented in severely abbreviated form. Nonetheless, the plot should remain logical and cuts should almost never call attention to themselves. This is where the transition from one scene to the next is important. Even if the action in neighboring scenes is separated in time or space, your editorial choices can make the juxtaposition so smooth that the viewer bridges the gap without conscious attention. The secret to a successful transition is establishing an easily-felt connection between the two scenes. In a plot-related transition, the connection is that of successive events in an unfolding story. For example, a shot of a new car might be used to introduce a documentary about its design and production. A neutral transition doesn’t in itself imply a story development or a change of time or place, but can be used to smoothly connect different excerpts from a scene. For example, cutting away to an interested audience member during a podium discussion lets you then cut back unobtrusively to a later point in the same discussion, omitting the part between. External transitions show something apart from the action. For example, during a shot inside the marriage registry, you might cut to the exterior of the marriage registry, where a surprise is already being set up. Transitions should underscore the message of the film and must always fit the respective situation, in order to avoid confusing viewers or distracting from the actual story line.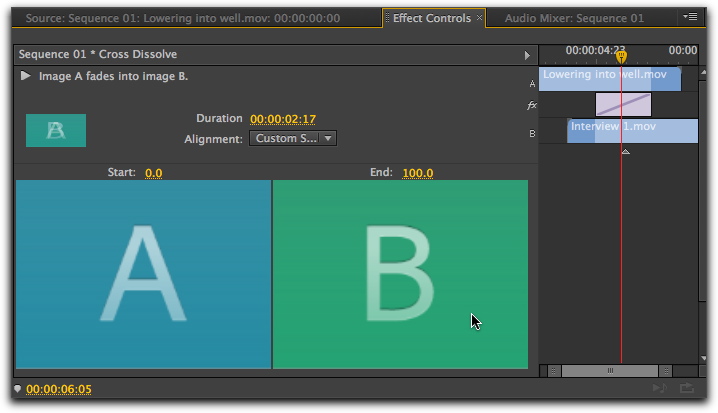
Logical sequence of action
The shots strung together during editing must interact appropriately in relation to the action. Viewers will be unable to follow the events unless the story line is logical. Capture viewer interest from the very beginning with a fast-paced or spectacular start and maintain that interest until the very end. Viewers can lose interest or become disoriented if scenes are strung together in a manner that is illogical or chronologically false, or if scenes are too hectic or short (under three seconds). There should be some continuity of motif from one scene to the next. Bridging the gaps Make an effort to bridge the gaps from one filming location to another. You can use close-ups, for example, to bridge chronological jumps, zooming in on the face, then back out after a few seconds onto a different scene. Maintain continuity Continuity – consistency of detail from one scene to the next – is vital in providing a satisfying viewing experience. Sunny weather does not fit with spectators who opened their umbrellas. Tempo of cuts The tempo at which a film cuts from one scene to the next often influences the message and mood of the film. The absence of an expected shot and the duration of a shot are both ways of manipulating the message of the film. Avoid visual disjunctions Stringing together similar shots in succession may result in visual disjunctions. A person may be in the left half of the frame onemoment and in the right half of the frame the next, or may appear first with and then without eyeglasses.

Do not string together pan
shots Pan shots should not be strung together unless they have the same direction and tempo. Rules of thumb for video editing Here are some guidelines that may be helpful when you come to edit your movie. Of course, there are no hard and fast rules, especially if your work is humorous or experimental. •Do not string together scenes in which the camera is moving. •Pans, zooms, and other moving shots should always be separated by static shots. •Shots that follow one another should be from different camera positions. The camera angle should vary by at least 45 degrees. •Sequences of faces should always be shot alternately from varying angles of view. •Change perspectives when shooting buildings. When you have similar shots of the same type and size, the picture diagonal should alternate between front left to rear right and vice versa. •Make cuts when persons are in motion. The viewer will be distracted by the ongoing motion and the cut will go almost without notice. In particular, you can cut to a long shot from the middle of the motion. •Make harmonious cuts; avoid visual disjunction. •The less motion there is in a shot, the shorter it should be. Shots with fast movements can be longer.

•Long shots have more content, so they should also be shown longer.
Ordering your video sequences in a deliberate manner not only permits you to produce certain effects, but even enables you to convey messages that cannot or should not be shown in pictures. There are basically six methods of conveying messages through cuts. Let’s look at each in turn. Associative cuts Shots are strung together in a certain order to trigger associations in the mind of the viewer, but the actual message is not shown. Example: A man bets on a horse race and, in very next scene, we see him shopping for an expensive new car at a car dealership. Parallel cuts Two actions are shown in parallel. The film jumps back and forth between the two actions; making the shots shorter and shorter until the end. This is a way of building suspense until it peaks. Example: Two different cars drive from different directions at high speed toward the same intersection. Contrast cuts The film purposely cuts unexpectedly from one shot to another, very different shot, in order to point up the contrast to the viewer. Example: A tourist lying on the beach; the next shot shows starving children. Substitutionary cut Events that cannot or should not be shown are replaced by other events (a child is born, but instead of childbirth, the blossoming of a flower bud is shown).Cause and effect cuts
Shots are related by virtue of cause and effect: without the first shot, the second would be incomprehensible. Example: A man fights with his wife and, in the very next shot, is seen sleeping under a bridge. Formal cuts Shots that vary in content can be strung together if they have something in common – the same shapes, colors, or motions, for example. Examples: A crystal ball and the earth; a yellow raincoat and yellow flowers; a falling skydiver and a falling feather. Soundtrack production Soundtrack production is an art, but it is an art one can learn. Of course, it is no easy task to create a superb narration, but short, informative comments are often very helpful for the viewer. Whatever narration there is should sound natural, expressive and spontaneous, not wooden or stiff. Keep comments brief A general rule applicable to all commentary is that less is more. Pictures should speak for themselves, and things that are evident to viewers from the pictures require no comment. Preserve original sounds Spoken commentary should be mixed with both the original sounds and the music in such a way that the original sounds can still be heard. Natural sound is part of your video footage and should not be cut away altogether if at all possible, because videowithout natural sound can easily seem sterile and lacking in authenticity. Frequently, however, the recording equipment captures noises from aircraft and cars that do not appear in the scene later. Sounds such as these, or loud wind noises, which can be distracting or annoying, should be masked, filtered or replaced with appropriate narration or music. Select appropriate music Appropriate music adds a professional finishing touch to your movie and can do a lot to reinforce the message of a video. The music selected, however, should always be appropriate to the message of the film. This is sometimes a time-consuming matter and a challenge, but greatly appreciated by the viewer. Title The title should be informative, describe the contents of the movie, and arouse interest. If it’s also a striking turn of phrase, so much the better. When it comes to presentation, the Title Editor gives almost unlimited scope for creative visuals. It’s one place in your production where you’re not tied to the reality of actual footage, so you can let your fancy run free. Of course, the ultimate goal is to communicate, so some basics almost always hold true. For instance, a concise title in a large, legible font is likelier to get its message across than one that is over- decorated or too long. Title colours The following combinations of background and text are easy to read: white with red, yellow with black, and white with green.
Exercise caution with very white titles on a very black background. Some video systems are unable to handle contrast ratios in excess of 1:40 and are unable to reproduce such titles in detail. Time on screen As a rule of thumb, a title should be displayed long enough to be read twice. Allow about three seconds for a title with ten letters. Allow an additional second of on-screen time for every five additional letters. ‘Found’ titles Besides postproduction titles, natural titles like directional signs, street signs or title pages of local newspapers also create interesting possibilities. --------------------------------------------------------------------------------
That’s all for now. You will get an appendix for glossary on the next page
Multimedia terminology contains computer and video terminology. The most important terms are defined below. 720p: A high-definition (HD) video format with a resolution of 1280x720 and progressive (non-interlaced) frames. 1081i: A high-definition (HD) video format with a resolution of 1440x1080 and interlaced frames. ActiveMovie: Software interface by Microsoft for the control of multimedia devices under Windows. See DirectShow, DirectMedia ADPCM: Acronym for Adaptive Delta Pulse Code Modulation, a method of storing audio information in a digital format. This is the audio encoding and compression method used in CD-I and CD-ROM production. Address: All available saving positions in a computer are numbered (addressed). By means of these addresses each saving position can be occupied. Some addresses are reserved for the exclusive use of particular hardware components. If two components are using the same address, this is called an “address conflict”. Aliasing: An inaccurate display of an image due to the limitations of the output device. Typically, aliasing appears in the form of jagged edges along curves and angled shapes. Anti-aliasing:
A method of smoothing out jagged edges in bitmap images. This is usually accomplished by shading the edges with pixels intermediate in color between the edge and the background, making the transition less apparent. Another method of anti- aliasing involves using higher resolution output devices. Aspect ratio: The ratio of width to height in an image or graphic. Keeping the aspect ratio fixed means that any change to one value is immediately reflected in the other. AVI: Audio Video Interleaved, a standard format for digital video (and Video for Windows). Batch capture: An automated process that uses an Edit decision list (EDL) to locate and recapture specific clips from a videotape, usually at a higher data rate than the clip was originally captured. BIOS: Acronym for Basic Input Output System, which refers to basic input and output commands saved in a ROM, PROM or EPROM. The essential task of the BIOS is the control of input and output. When the system is started, the ROM-BIOS carries out some tests. See Parallel port, IRQ, I/O. Bit: Abbreviation of “BInary digiT”, the smallest element of a computer’s memory. Among other things, bits are used to store the color values of pixels in an image. The more bits used for each Pixel, the greater the number of available colors. For example: •1-bit: each pixel is either black or white. •4-bit allows 16 colors or gray shades.
•8-bit allows 256 colors or gray shades. •16-bit: allows 65,536 colors. •24-bit: allows about 16.7 million colors. Bitmap: An image format made up of a collection of dots or “pixels” arranged in rows. See Pixel. Blacking: The process of preparing a videotape for insert editing by recording video black and continuous control track on the entire tape. If the recording deck supports timecode, continuous timecode will be recorded simultaneously (also called “striping”). Brightness: Also “luminance”. Indicates the brightness of video. Byte: One byte corresponds to eight ?? bits. With one byte, exactly one alphanumeric character can be displayed (i.e. a letter, number). CD-ROM: Mass storage media for digital data, such as digital video. CD- ROMs can be read from but not written (recorded) onto: ??ROM is an acronym for Read-Only Memory. Channel: Classifications of information within a data file to isolate a particular aspect of the file. For example, color images use different channels to classify the color components in the image. Stereo audio files use channels to identify the sounds intended for the left and right speakers. Video files use combinations of the channels used for image and audio files. Clip:
In Pinnacle Studio, any media element used on the timeline of a movie or disc project. Clip media include videos, audio files, photos, titles, and Montage. Clipboard: A temporary storage area shared by all Windows programs, used to hold data during cut, copy, and paste operations. Any new data you place onto the clipboard immediately replaces the existing data. Closed GOP: ??GOP Codec: Contraction of compressor/decompressor – an algorithm that compresses (packs) and decompresses (unpacks) image data. Codecs can be implemented in either software or hardware. Color depth: Number of bits delivering the color information for each pixel. A 1-bit color depth allows 21=2 colors, an 8-bit depth allows 28=256 colors, and a 24-bit depth allows 224=16,777,216 colors. Color model: A way to mathematically describe and define colors and the way they relate to each other. Each color model has its own strengths. The two most common color models are ??RGB and ??YUV. Color saturation: Intensity of a color. Complementary color: Complementary colors are opposite in value to primary colors. If you were to combine a color with its complement, the result
would be white. For example, the complementary colors of red, green and blue are cyan, magenta and yellow respectively. COM Port: A serial port located on the back of your computer for attaching a modem, plotter, printer or mouse to the system. Composite video: Composite video encodes luminance and chrominance information into one signal. VHS and 8mm are formats that record and play back composite video. Compression: A method for making files smaller in size. There are two types of compression: lossless and lossy. Files compressed with a lossless scheme can be restored unchanged from their original state. Lossy schemes discard data during compression, so some image quality is sacrificed. The loss of quality may be negligible or severe depending on the amount of compression. Cropping: Choosing the area of an image to be displayed. Data rate: The quantity of data transmitted per unit time; for example, the number of bytes read from or written to a hard drive per second, or the amount of video data processed per second. Data transfer rate: The measurement of the speed at which information passes between the storage device (e.g. CD-ROM or hard drive) and the display device (e.g. monitor or MCI device). Depending on the devices used, some transfer rates may offer better performance than others.
DCT: Discrete Cosine Transformation – part of JPEG image data compression and related algorithms. The brightness and color information is saved as a frequency coefficient. DirectShow: System extension by Microsoft for multimedia applications under Windows. See ActiveMovie. DirectMedia: System extension by Microsoft for multimedia applications under Windows. See ActiveMovie. DirectX: A bundle of several system extensions developed by Microsoft for Windows 95 and its successors to make possible video and game acceleration. Dissolve: A transitional effect in which the video is faded from one scene to the next. Dithering: Increasing the number of apparent colors in an image by the application of color patterns. Decibel (dB): A unit of measurement of the loudness of sound. An increase of 3 dB doubles the loudness. Digital8: Digital videotape format that records DV-coded audio and video data on Hi8 tapes. Currently sold only by Sony, Digital8 camcorders and VCRs can play both Hi8 and 8mm cassettes.
Digital video: Digital video stores information bit by bit in a file (in contrast to analog storage media). HDV: A format for the recording and playback of high-definition video on a DV cassette tape. has been established as the ‘HDV’ format. Instead of the ‘DV’ codec, HDV uses a flavor of MPEG-2. There are two varieties of HDV: HDV1 and HDV2. HDV1 is 1280x720 resolution with progressive frames (720p). The MPEG transport stream is 19.7 Mbps/s. HDV2 is 1440x1080 resolution with interlaced frames (1080i). The MPEG transport stream is 25 Mbps/s. Hi8: Improved version of Video8 using S-Video recorded on metal particle or metal evaporated tape. Because of higher luminance resolution and wider bandwidth, the result is sharper pictures than Video8. HiColor: For images, this normally means a 16-bit (5-6-5) data type that can contain up to 65,536 colors. TGA file formats support images of this type. Other file formats require prior conversion of a HiColor image into TrueColor. For displays, HiColor normally refers to 15-bit (5-5-5) display adapters that can display up to 32,768 colors. See Bit. Huffman coding: Technique used in JPEG and other data compression methods in which seldom occurring values receive a long code, while frequently-occurring values receive a short code. -----------------------------------------------------------------------------------
also see
Tuesday, 13 October 2015
8 Must have apps for beginner film makers
8 Must have PC/MAC apps for beginner film makers
Softwares are Sooo important when we are making a short film, we apps for editing, sound mixing, poster designing etc. Im writing this article because, many of newbie film makers make mistakes in choosing these kind of softwares. First of all, this is mainly for beginners and short film makers who is making their first venture. But I'll note professional apps too, so let's get started.ADOBE PREMIER PRO or FINAL CUT PRO
These two apps are editing platforms, I personally prefer Premiere Pro, because its extremely user friendly, for any one who have used pinnacle studio, Vegas pro, or even windows movie maker it will seem to be familiar l, and it have same capability as Final cut pro. Final cut pro is more professional, it is used in film industry, You can also use Pinnacle studio, Sony Vegas pro, Corel video studio etc. But Premier pro and Final cut pro the mainly used and, it will guarantee you standard results.ADOBE AUDITION
I personally prefer this for sound editing and mixing, it is not so much professional but still full fills an beginner's needs, its very user friendly, There is professional app like Pro Tools, But it is so advanced and needs good knowledge about Musical stuff, Audition is a powerful app to make effects and edit audio.
see
Editing and Cinematography complete guide tutorial also
ADOBE AFTER EFFECTS
This is a must have app. I didn't find any appropriate 'or' version for this software, This is a very powerful and user friendly app for generating visual effects, title sequences etc. It can also be used for kind of advanced stuff like colour grading.ADOBE PHOTOSHOP
It feels like an Adobe Store right??? But I promise you I'm not an Adobe agent! But these guys are making excellent apps for multimedia production. Photoshop is an famous software, No app gives you more than Photoshop for photo editing. I love this app because it is extremely built for newbies and it is damn professional. You can also try GIMP which is an free software.ADOBE ILLUSTRATOR
This is one of my favorites. This is used for making logos, title design font design etc. I didn't find any other apps useful as this one. If you are to make your own font, or logo for your movie, this is the perfect app to use. Again trust me I'm not a adobe agent.ADOBE MEDIA ENCODER
This is for advanced guys, this is used for converting the output for different media streams. This is the perfect and powerful one. It allows us to change very minute settings before encoding. I've used MOVAVI VIDEO CONVERTER, its also useful, but it is very basic.VIRTUAL DUB
Oh my god, first non-Adobe app in the list, I thing no you believe me. Virtual Dub is a useful and simple app which can used as your dubbing screen. It allows you to synchronise your video and audio frame by frame. It is a light and useful app.SUBTITLE WORKSHOP
As the name suggests its for making subtitles, you can make, edit, synch. Subtitles simply. This is basic software needed in a editing PC. If you are upto make a non-english film, so that if you are uploading it for competitions, film fests you will need subtitles. So go grab itsee
Editing and Cinematography complete guide tutorial also
Beginners guide for short film production part 1,
Best 5 low budget cameras under $550 (35000 indian rupee) for shortfilm production
Communist Pacha malayalam short film trailer
Best 5 low budget cameras under $550 (35000 indian rupee) for shortfilm production
Communist Pacha malayalam short film trailer

Friday, 9 October 2015
Best 5 low budget cameras under $550 (35000 indian rupee) for shortfilm production
Best 5 Low budget Cameras Under $550 (35000 Indian rupee) for Short Film production
When you are making a short film the first thing your will search for will be a camera. Many people spend majority of their budget for camera. According to me, Its truly ridiculous. We cant spend even half of our budget in camera because we have other expenses, we have to buy Recording gears, tripods lights etc. So its best to choose a low budget camera for short films. 550$ isn't that much low but you have to afford it in order to make short films, So there is it our top five list.
1.Canon 600D T3i.

Canon 600d T3i with 18-55 lens
Price 35000
Best Camera for short films under $550
1.Canon 600D T3i.
 |
Canon 600d T3i with 18-55 lensPrice 35000 |
Canon 600D Key Features
2.Nikon D5100
 |
Nikon D5100 with 18-55mm LensPrice 32699 |
Nikon D5100 Key Features
- 16.2 megapixel DX-format CMOS sensor
- Side-articulated 3.0" LCD monitor (920,000 dots)
- 11 AF points (with 3D tracking)
- IS0 100-6400 range (Up to 25,600 equivalent when expanded)
- HD movies (1080p, 720p or WVGA)
- 4 fps continuous shooting
- Get a full reviewIn-camccra effects filters in both stills and video modhgfhfghfghes
3.Canon EOS 1100D
 | ||||
Canon EOS 1100DPrice 32000Canon 1100D Key Features
The EOS 1100D's has a built-in pop-up flash with a guide number of 9.2 at ISO 100, coverage up to 17mm focal length, X-sync speed of 1/200sec and a recycle time of 2 seconds. There's also the expected hotshoe for use with one of Canon's external flashguns. There is a built-in microphone for mono recording, but you can't connect an external microphone for stereo recording. The HDMI port allows you to connect the EOS 1100D directly to an HDTV set. One notable omission is the lack of the EOS integrated cleaning system, which means that you'll need to manually clean the camera's sensor more often, something that we suspect most of the EOS 1100Ds owners will not even attempt.
The EOS 1200D now features the fully-automatic Scene Intelligent Auto mode, which analyses the scene in front of you and automatically picking the best settings, much like the systems used by lot of digital compacts. The 1200D also offer a Creative Auto mode which allows you to change a few key settings using the LCD screen via a simple slider system for changing the aperture and exposure compensation, or Background and Exposure as the camera refers to them. Creative Auto also includes Basic +. Essentially a more extreme version of the well-established Picture Styles, this offers nine options including Standard, Vivid, Soft, Warm, Intense, Cool, Brighter, Darker and Monochrome, all of which can be interactively tweaked to suit your taste.
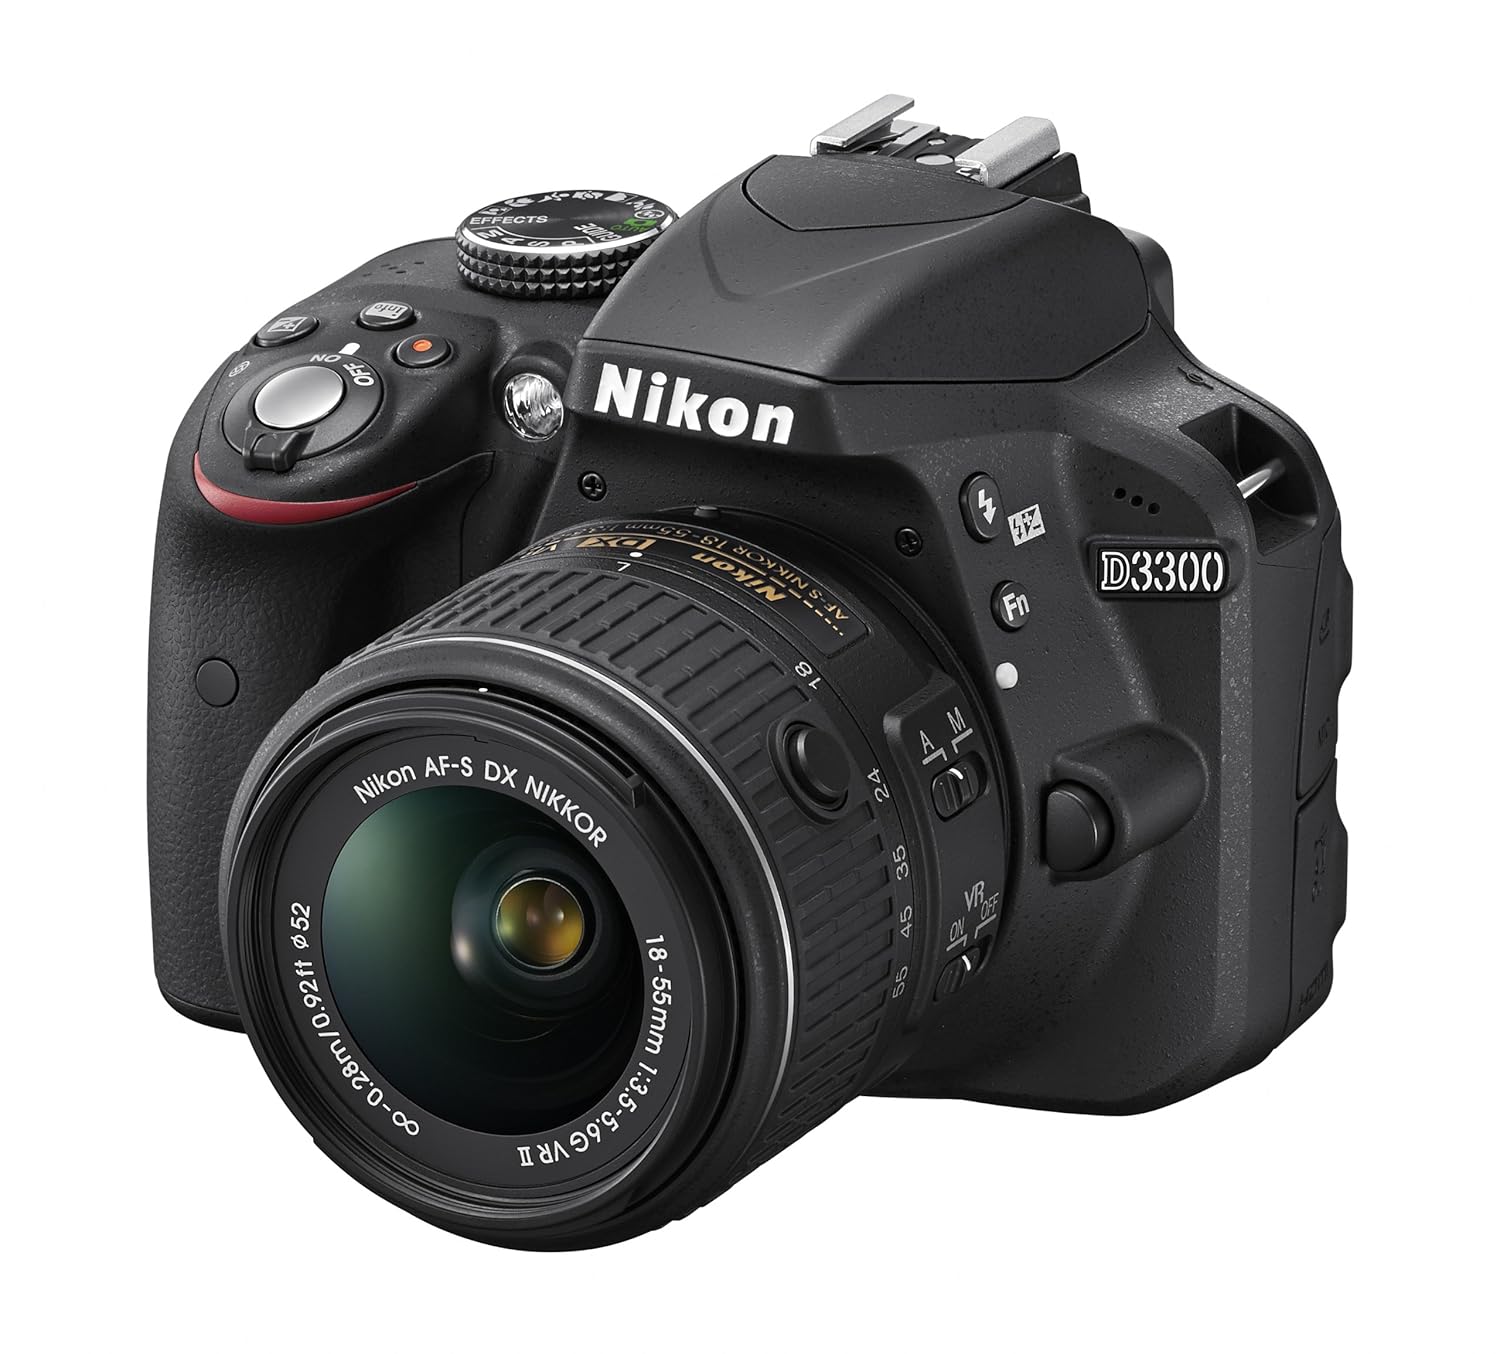
Get a full review 5.Nikon D3300
|


Tuesday, 6 October 2015
Beginners Guide for short film production part 1
Hey folks and welcome to my very first post about short film production.
First I've to say that this tutorial is for beginners and who have little knowledge about film making.
I've decided to write a few posts in this series, so this is part one. Lets get started.
In this part i'm going to cover every headlines and in every next part I'll describe it to you.
First things first.
1. PLANNING
Planing is the primary and important part in film making, if you have a plan of every thing happening in the scene, your workload can be reduced drastically. Its better to make sketches of the scenes. I'm very sure that if you have a good planning, it will be more fun at the shooting spot.
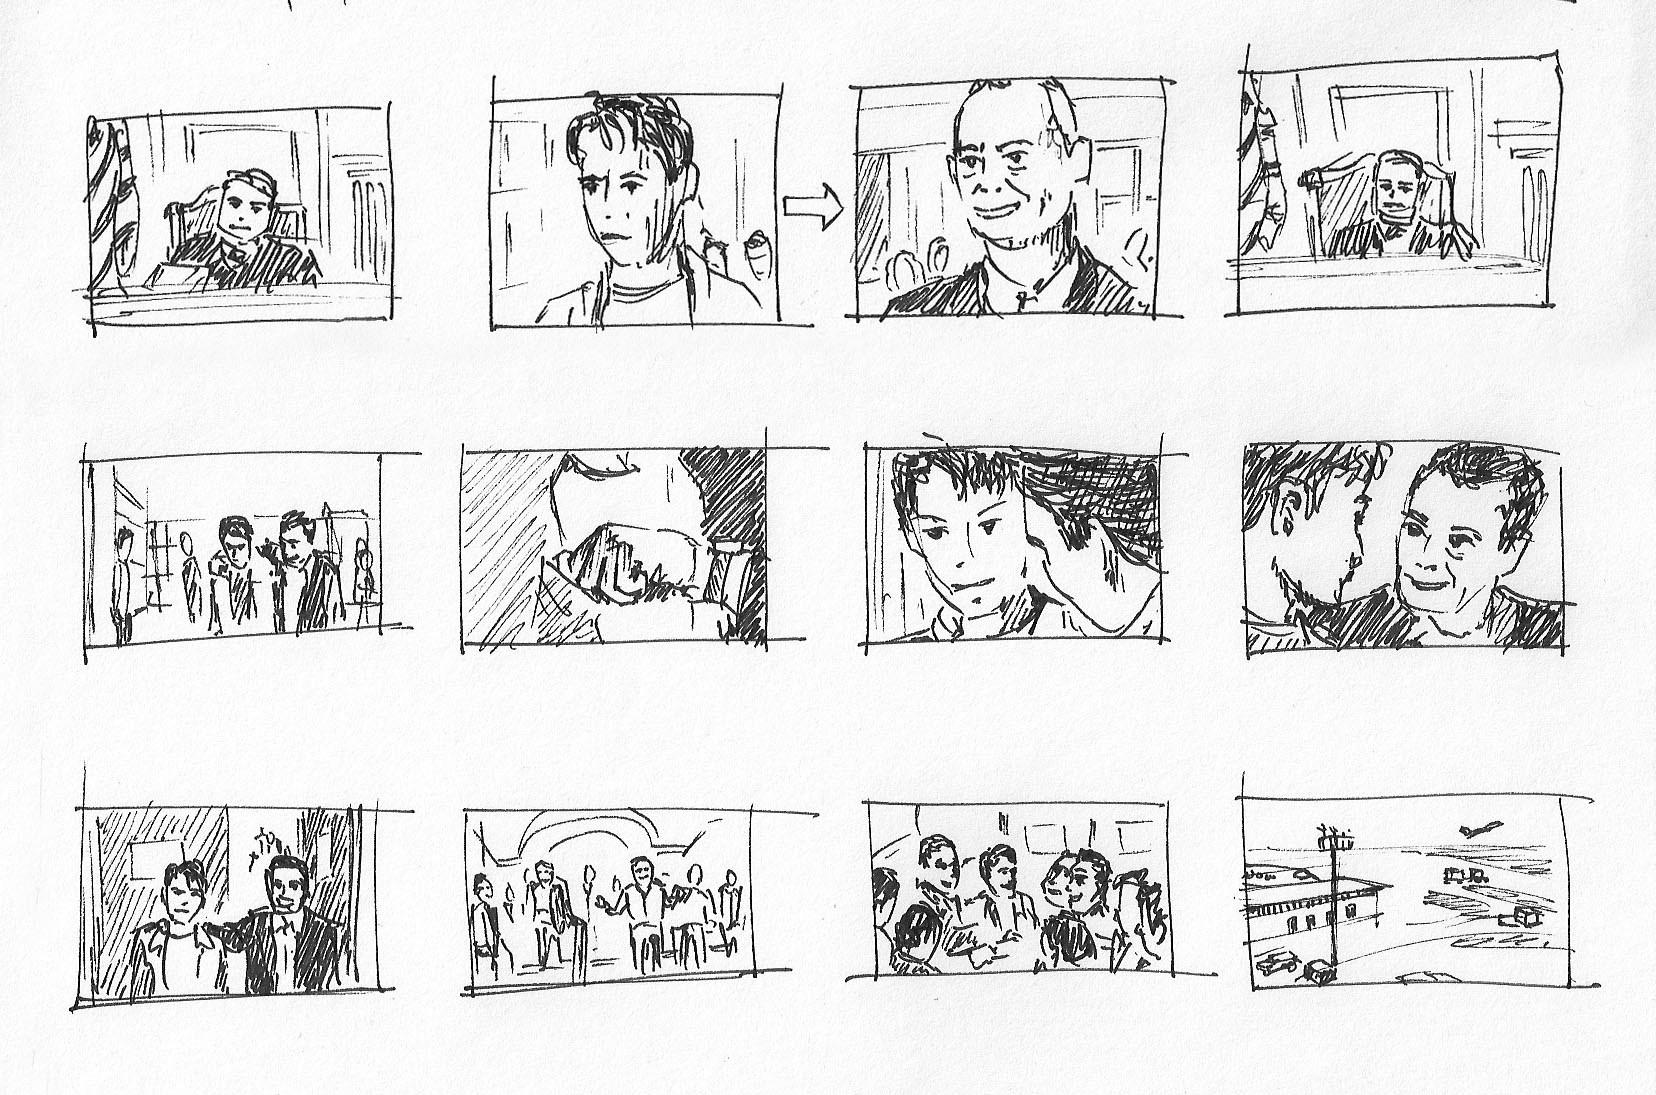 |
| Example sketch 2 |
 |
| Example sketch 1 |
2. ANNOUNCING:
Announcing short film is related to promotion purpose. When you are ready and everything is set you can announce your short film through Facebook pages, Twitter account your websites, blogs etc. Announcing your short film is very important because people have to know about your short film. You have to announce a short film first and frequently update status about your short film. So that people get noticed. it is also good to make posters and trailers frequently.


3. SCRIPT
script is a must in location because shooting without script is like drawing in water it's better to write on paper and if you are so lazy to write in paper you can use PC apps like final draft and there is mobile app called dub script.
 |
| final draft software |
4. PREPARATION BEHIND THE REEL.
This part is specially for the low budget, or even zero budget film makers. Make sure you have all the things you need such as a camera ( you can use smart phones, digital cameras etc.) You will need a computer with a video editing program to edit and combine your clips, next is a dubbing Mike,its costly so if you don't have it, you can use a smart phone to record audio, and you can get ambience sound from internet resources. But when you use smart phone to dub the audio clarity will drastically reduced. There is several studios which offer you high clarity dubbing equipments with a cost. But that is costly so zero budgeters can't think that way. Another important thing is distributing the workload, its a short film and its good to avoid unwanted people in your location. A Director-Cinematographer-Editor is the best combination on site.

5. SHOOTING
This is the most important thing which have to done fastly, but without a rush. Always have a plan of what you are going to shoot, you should have a script. Never ever shoot without a proper script. Always remember that any thing that you have written is not final, we can improve it any time while shoot, hear every one on the set, improvements can be made. Always remember do not shoot in a hurry, take time to plan camera angle and prepare shot. You will eventually become fast, but never do it in a hurry. But slowing down will effect the whole crew.

Make sure every one is noticing your work. Its hard to find audience for a YouTube film, but remember YouTube is the second most biggest search engine. So make a channel for your account before you upload your short film. When shoot is in progress make teasers, trailers, posters and share it on your Facebook, Twitter and other social sites, Facebook is an great way to advertise. Always share your short film's status on these sites, so people will get noticed.

So that's all for today.
Next post will come very soon, I'll publish it tomorrow.
Hope it was helpful.
So see you guys
Sunday, 4 October 2015
Communist Pacha malayalam short film trailer
Catch it!!!!
Subscribe to:
Comments (Atom)